One of the easiest ways to gain performance benefits for your web application is to compress your files with a compression algorithm. All browsers automatically support gzip compression, which means the browser will know how to decompress it automatically by sending the proper response headers. Your clients will eventually download a much smaller bundle and will load the application faster.
When you create a new react project with create-react-app the created project will encapsulate many of the internal modules being used to build the project.
By default, this kind of project does not have access to the webpack configuration files. To be able to integrate the compression inside our build process we must be able to control the encapsulated modules and their files.
In-order to edit webpack’s configuration file in a react project we must start by ejecting the project.
Ejecting the project is a one-way operation, make sure to work on a separate branch to avoid any issues and be able to return to the previous project’s state.
If you do not wish to eject read the following article: Learn How To Compress Your Responses With Express and Node.js
Now before we eject let’s look at the dependencies for a newly created project:
PACKAGE.JSON DEPENDENCIES BEFORE EJECTING
{"name": "react-gzip","version": "0.1.0","private": true,"dependencies": {"@testing-library/jest-dom": "^4.2.4","@testing-library/react": "^9.3.2","@testing-library/user-event": "^7.1.2","react": "^16.13.1","react-dom": "^16.13.1","react-scripts": "3.4.1"},.........}
Most of the dependencies are hidden from us so it’s a pretty short list, lets eject the project by running the following command and see the difference:
npm run eject
After ejecting we can see that many internal dependencies were added to the package.json file (webpack, babel, eslint, jest…).
Don’t be intimidated by the number of changes and added dependencies, you gain full control over the project when ejecting.
PACKAGE.JSON DEPENDENCIES AFTER EJECTING
{"name": "react-gzip","version": "0.1.0","private": true,"dependencies": {"@babel/core": "7.9.0","@svgr/webpack": "4.3.3","@testing-library/jest-dom": "^4.2.4","@testing-library/react": "^9.3.2","@testing-library/user-event": "^7.1.2","@typescript-eslint/eslint-plugin": "^2.10.0","@typescript-eslint/parser": "^2.10.0","babel-eslint": "10.1.0","babel-jest": "^24.9.0","babel-loader": "8.1.0","babel-plugin-named-asset-import": "^0.3.6","babel-preset-react-app": "^9.1.2","camelcase": "^5.3.1","case-sensitive-paths-webpack-plugin": "2.3.0","css-loader": "3.4.2","dotenv": "8.2.0","dotenv-expand": "5.1.0","eslint": "^6.6.0","eslint-config-react-app": "^5.2.1","eslint-loader": "3.0.3","eslint-plugin-flowtype": "4.6.0","eslint-plugin-import": "2.20.1","eslint-plugin-jsx-a11y": "6.2.3","eslint-plugin-react": "7.19.0","eslint-plugin-react-hooks": "^1.6.1","file-loader": "4.3.0","fs-extra": "^8.1.0","html-webpack-plugin": "4.0.0-beta.11","identity-obj-proxy": "3.0.0","jest": "24.9.0","jest-environment-jsdom-fourteen": "1.0.1","jest-resolve": "24.9.0","jest-watch-typeahead": "0.4.2","mini-css-extract-plugin": "0.9.0","optimize-css-assets-webpack-plugin": "5.0.3","pnp-webpack-plugin": "1.6.4","postcss-flexbugs-fixes": "4.1.0","postcss-loader": "3.0.0","postcss-normalize": "8.0.1","postcss-preset-env": "6.7.0","postcss-safe-parser": "4.0.1","react": "^16.13.1","react-app-polyfill": "^1.0.6","react-dev-utils": "^10.2.1","react-dom": "^16.13.1","resolve": "1.15.0","resolve-url-loader": "3.1.1","sass-loader": "8.0.2","semver": "6.3.0","style-loader": "0.23.1","terser-webpack-plugin": "2.3.5","ts-pnp": "1.1.6","url-loader": "2.3.0","webpack": "4.42.0","webpack-dev-server": "3.10.3","webpack-manifest-plugin": "2.2.0","workbox-webpack-plugin": "4.3.1"},..................}
Now lets install our compression plugin:
npm install compression-webpack-plugin --save-dev
After installing go to webpack.config.js file and import the plugin:
const CompressionPlugin = require("compression-webpack-plugin");
Then add the plugin directly to the plugins property inside module.exports:
module.exports = {// ...// ...plugins: [......new CompressionPlugin({algorithm: 'gzip',test: /.js$|.css$/,})]// ...// ...};
I’ve supplied two options to the compression algorithm:
- The type of algorithm to use.
- Which file types should it compress ( the test property ).
With these options supplied every javascript and css file will be compressed.
You can decide to avoid compressing files that are smaller than a certain size in bytes by using the threshold property.
For a full list of available options refer to the documentation at: (https://webpack.js.org/plugins/compression-webpack-plugin/)[https://webpack.js.org/plugins/compression-webpack-plugin/]
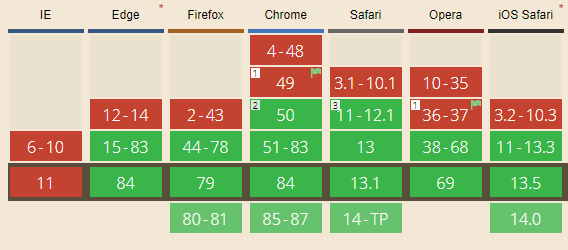
There is another popular and even more effective compression algorithm called brotli, depending on your project you can decide whether to use it or not, just be aware that if your project should support internet explorer then brotli is not supported.
Overall browser support from caniuse.com:
Now that you’ve integrated the compression plugin in the build process you can build your project with the scripts that you already have or by using:
At my previous position as a Fullstack Developer, I’ve used gzip compression on a production application, the project’s size before compression was 3MB which by any standard is way too large for the user to download, especially an e-commerce site. After compression, the project size was 773KB which is a 74% decrease in package size! By doing so our mobile users were able to download the application 74% faster for the initial entrance to the application.
After the build is finished webpack should generate the normal build files and the compressed files.
- SERVING THE PROJECT TO OUR CLIENTS
For the purpose of this article I’ve set up a new react project, ejected it and, added the webpack compression plugin.
I’ve also created a simple Node.js server that will serve our files, any request that needs a javascript file will check if there is a compressed version and will serve it instead.
const cors = require("cors");const express = require("express");const path = require("path");const fs = require("fs");var port = process.env.PORT || 3000;// Path to build directoryconst clientDirPath = path.resolve(__dirname, "build");// Path to index.html fileconst clientIndexHtml = path.join(clientDirPath, "index.html");// Init expressconst app = express();const serveRouter = express.Router();// Enable corsserveRouter.use(cors());// For each request for .js file// return the compressed version .gzapp.get("*.js", function (req, res, next) {const pathToGzipFile = req.url + ".gz";try {// Check if .gz file existsif (fs.existsSync(path.join(clientDirPath, pathToGzipFile))) {// Change the requested .js to return// the compressed version - filename.js.gzreq.url = req.url + ".gz";// Tell the browser the file is compressed and it should decompress it.// You will get a blank screen without this header because it will try to parse// the compressed file.res.set("Content-Encoding", "gzip");res.set("Content-Type", "text/javascript");}} catch (err) {console.error(err);}next();});// Set the static files root directory// from which it should serve the files from.console.log("clientDirPath", clientDirPath);app.use(express.static(clientDirPath));// Always send the index.html file to the clientapp.get("*", (req, res) => {res.sendFile(clientIndexHtml);});console.log("Starting server");app.listen(port, () => {console.log(`Listening on port: ${port}`);});
There are a few things you should be aware of:
clientDirPath will lead to the output build directory. if you’ve changed the name of your build folder you must change it here.
clientIndexHtml will lead to the main page that renders our application, if the name has changed you must also change it here.
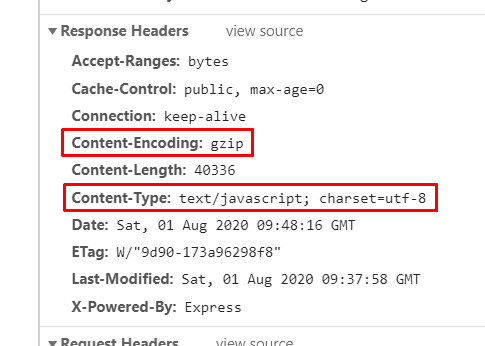
You should also be aware that I’ve set two response headers:
Content-Type: text/javascript – It tells the browser we are returning a javascript file.
Content-Encoding: gzip – it tells the browser that the file is compressed using gzip compression, the browser will automatically know to decompress it, without this header you will probably be staring at a blank screen.
The code checks every request for javascript files, If we don’t have a compressed version it will serve the file normally.
Let’s see the results, before compression the bundle size is 130KB.
after compression the bundle size is 40KB!
If this article was of value to you then add me on Linkedin or join “I Read You Learn” Facebook Group by clicking the social icons to the right.
Happy Coding!


